

This installment in my series “The Math Behind LEGO Building Techniques” (see Volume 1, 2, 3 here) will include an assortment of items related to topics that have already been covered in this blog or my book. They are mostly updates arising from new terms or new LEGO pieces that have been introduced since the last installment was published.
About the “sugar grid” …
You’ve probably been hearing or reading about the “sugar grid” technique for placing LEGO pieces at angles. This term was coined by Chris Enockson who has an excellent and fast-growing Youtube channel Brick Sculpt that talks about building techniques, among other LEGO-related topics. There’s also a highly informative and well-received article by Arno Knobbe on this topic that was posted on New Elementary. So how does the “sugar grid” fit into the framework of angled wall techniques that have been discussed on this blog (and were covered in my book)? Let’s find out!
Mathematically speaking, all the techniques for attaching LEGO pieces at angles other than 0° and 90° involve right triangles. The most common of these techniques involves placing a LEGO brick or plate along the hypotenuse (the longest side which is opposite the right angle) of a single right triangle. For this to work, the length of the hypotenuse has to be a whole number of studs (see Pythagorean triples) or close enough to one (see near triples). However, since the number of useful Pythagorean triples and near triples is quite small, this greatly limits our options and the angles we can create.
There’s another group of techniques that involves two right triangles that share a hypotenuse. We do not place any LEGO pieces along this hypotenuse, and so its length does not have to be a whole number. Instead, we create angled walls by placing LEGO pieces along the sides that make up the right angles in the two triangles. This opens up many more possibilities because it works for right triangles with any arbitrary (whole number) side lengths.
Two of the techniques covered in this blog (the “mirrored hypotenuse” technique and the “switched diagonals” technique) are essentially based on this concept which Chris and Arno have generalized into what they call the “sugar grid”. To better understand how this works, let’s start with a simple 2×3 plate A and consider the right triangle formed by the studs numbered 2, 3 and 4. The two sides that make up the right angle are 2 and 1 studs long (measuring the distance between the studs 2-3 and 3-4). The length of the hypotenuse (2-4) is √22+12 = √5 which, of course, is not a whole number. Next, take a second 2×3 plate B, and consider the right triangle formed by studs 1, 2 and 3. The two identical (but mirrored) right triangles have hypotenuses (2-4 and 1-3) that are identical in length.

So you should be able to rotate plate B such that its hypotenuse 1-3 lines up with the hypotenuse 2-4 on plate A and attach the two 2×3 plates together using 1×1 round plates as spacers. There are in fact, 4 identical right triangles that share the same hypotenuse; two on the original 2×3 plate and two on the rotated 2×3 plate. The angle of rotation is 53.13° which is twice the smaller angle in each right triangle.

This gives you another way to create angled walls without limiting you to Pythagorean triples. You’re still limited to the angles that can be created for various whole number side lengths of the right triangles, but there are many more options available. Arno’s article mentions Legal LEGO Angle Finder which is a tool that helps you pick the right plate sizes to use for the angle you want to create. It’s also possible to stack plates in multiple layers, each with their own rotation, for even more options.
Now, imagine the triangle from the first 2×3 plate repeating across the entire LEGO grid. We can again call this grid A. Similarly, grid B would have the triangle from the second 2×3 plate repeated.

It should be possible to rotate grid B and overlay it on grid A such that the studs at the ends of the hypotenuses of the right triangles line up. The rest of the studs on grid B will not line up with the studs on grid A, but the studs at the ends of the hypotenuses can serve as connection points between the two grids. This sparser grid of connection points allows LEGO elements to be attached in one of two orientations (aligned with either grid A or grid B).

This is the concept of the “sugar grid”. As expected, as the sides of the right triangles increase in length, the “sugar grid” gets sparser (the number valid connection points decreases as a proportion of the total number of available studs in each grid).
So where does the term “sugar grid” come from anyway? Apparently its origins are from Minecraft, which isn’t something I am very familiar with. But I was curious to find the connection anyway. Here’s what I was able to glean from a little bit of research (more experienced Minecrafters can feel free to correct me). In Minecraft, sugarcane farming is important because sugarcane is a valuable resource that can be used to create a variety of other things. Sugarcane obviously needs water to grow.
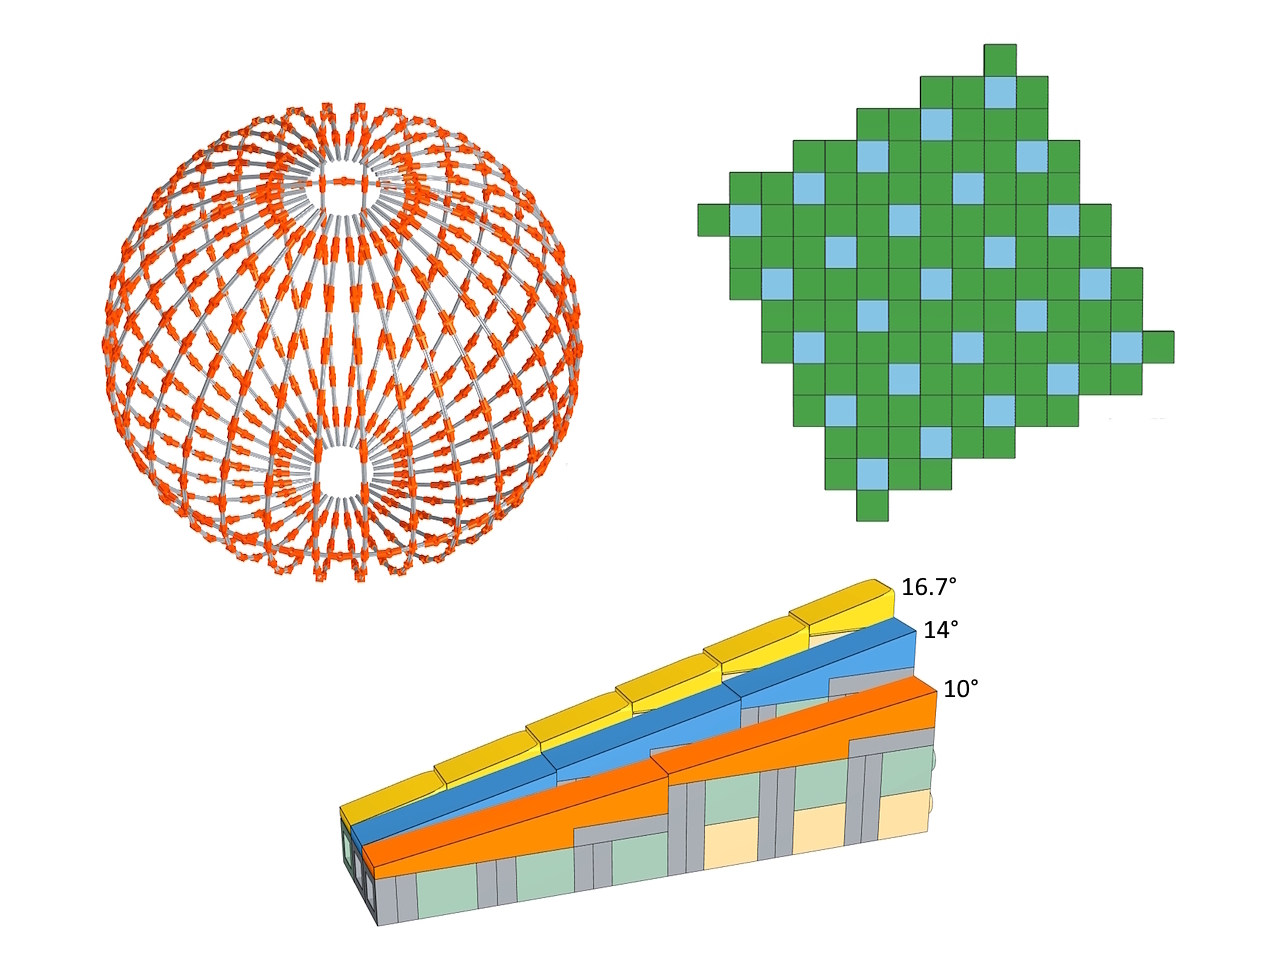
A common challenge in sugarcane farming is to place sugarcane blocks (represented by the green squares) in the most efficient way such that each one is adjacent to a water block (represented by the blue squares). This can be achieved by tiling any given area with a plus shaped pattern with a water block in the center surrounded by sugarcane blocks on all 4 sides. This way, you end up with the water blocks placed in a grid that resembles the grid of connection points that we saw earlier (the image below shows the sugarcane grid recreated using LEGO 1×1 tiles). Hence the name “sugar grid”. The connection may be tenuous, but I can’t disagree with the fact that “sugar grid” is a catchy and intriguing name to describe the concept.

As Arno shows us in his article, the concept of the “sugar grid” doesn’t limit you to just regular studs-up building. In a clever example, he shows how it can be extended to sideways building aka SNOT as long as you can get the sideways studs to be spaced correctly to conform to the “sugar grid”. The studs here again form the hypotenuses of right triangles with side lengths of 2 and 1 studs.

Arno’s article also mentions an official LEGO set (The Lord of the Rings: Rivendell 10316) that utilizes a “sugar grid” connection. Are you aware of any others?
Technic connector #2.5?
In the most recent volume of The Math Behind LEGO Building Techniques, I had covered the family of Technic angled connectors #1 through #6 that allow you to connect axle pieces at various angles ranging from 90° (#6) to 180° (#2). These connector pieces have been in the LEGO catalog since the late 1990s. So it was quite surprising to see a new member joining this family in 2024 – Technic Axle and Pin Connector Angled #7 – 168.75° (4450). This part has only been used in a handful of sets so far. I have not studied the instructions for these sets to see what the compelling reason was to create a new connector, but it’s definitely an interesting piece.

The one thing that doesn’t make sense with this new connector is the number (#7) assigned to it, and I would even argue that the number should have been #2.5. Confused? If you take a closer look at connectors #2 through #6 and the angles they create, you will see that these angles are separated by increments of 22.5° (which is a quarter of 90°). In fact, for all the connectors except #1 you can get the angle that they create using the formula 225° – n x 22.5° where n is the connector number. If you use this formula for the angle created by the new connector (168.75°), the value of n comes out to be 2.5. But I guess it was easier for LEGO to just name it #7. Here’s an updated table that shows the Technic connectors including connector #7.
| Number | Part Number | Angle |
| 1 | 32013 | – |
| 2 | 32034 | 180° |
| 3 | 32016 | 157.5° |
| 4 | 32192 | 135° |
| 5 | 32015 | 112.5° |
| 6 | 32014 | 90° |
| 7 | 4450 | 168.75° |
While the angle 168.75° may seem quite random, it really isn’t. It happens to be the interior angle of a regular polygon with 32 sides. You can determine this by solving for n (the number of sides) the equation for the internal angle (n-2) * 180° / n = 168.75° (see more about polygon geometry here). If you use 32 of these connectors and axles you can create a much smoother approximation of a circle than is possible with the other connectors (especially the #3 connector used to create a 16-sided polygon in the Globe set I covered in the article). The resulting diameter is of course, going to be bigger. So is it possible to use the new connector to create a bigger version of the Globe set? The first step would be to create a frame which as it turns out, has a diameter of 64 studs (see the image). It will be a lot more tricky to create the outer skin using wedge plates for this bigger version, but it is something I will be looking into. Stay tuned!

A few new slopes
LEGO continues to expand their catalog of slope pieces and a few recent additions have been particularly noteworthy. They are 3 slopes that are 2, 4 and 6 studs long with no studs on top. The three new additions to the slope family are the 2×1 slope (#5404) that is 2 plates tall, 4×1 slope (#5654) and 6×1 slope (#4569), the last two of which are 3 plates (or 1 brick) tall. If the new 2×1 slope looks familiar, that is because a version with a grille (#61409) also known as the “cheese grater” has been available since 2008. LEGO finally decided to give us a version of this slope piece without the grille.

So what angles do these new slope pieces create? Like most other slope pieces, they have a lip at the bottom of the slope that is half a plate high. The 2×1 slope rises approximately 2-0.5 = 1.5 plates over 2 studs which makes its angle arctan(1.5/5) = 16.7°, but the official name of the slope from Bricklink rounds this off to 18°. This slope also has a groove at the bottom (much like the 1×1 cheese slope) which makes it easier to pry the piece off without ruining your fingernails. Looking at the new 4×1 and 6×1 slopes, they rise 3-0.5 = 2.5 plates over 4 and 6 studs respectively making their angles arctan(2.5/10) = 14° and arctan(2.5/15) = 9.46° respectively (the latter of which is rounded off to 10° in the official Bricklink name).
The half plate lip means that you have to resort to some SNOT to get a smooth slope using two or more of these elements.

Here are all 3 types of slopes side by side showing the subtly different angles they create.

But one interesting side effect of the half plate lip is that the 4×1 and 6×1 slopes have a sloping portion that is 2.5 plates high which make the slopes line up almost perfectly with the 4×2 (#41769, #41770) and 6×2 (#78443, #78444) wedge plates attached sideways.

LEGO has already used these new slopes to great effect in several official sets including Marvel Logo & Minifigures 76313 where all three slopes are used to create the letters in the logo. I am sure MOC builders will also find these new slopes to be a useful addition to their arsenal.
Addendum: Luca Hermann (a very talented builder from Germany) pointed out that in the new 4×1 and 6×1 slopes, the “half plate lip” is a little taller than half a plate. It’s somewhere between 0.25 and 0.3 studs (0.625 and 0.75 plates). This would make the angle of the 6×1 slope more like 9° and may explain the slight stair-stepping that is seen when we use SNOT to try to create a smooth slope using two or more of the 6×1 slopes. Luca has verified this by using 40 of these slopes to create a perfect circle (40 x 9° = 360°) in a recent MOC (shown below is the round base of the Washington Monument that he designed).

Until the next installment, happy building!


